
Introduction
NetSuite gives us a native way to do this using the Custom GL Lines Plug-in. The Custom GL Lines Plug-in allows you to modify the GL impact of standard and custom transactions. It does this by adding custom GL lines to the GL impact. I will detail a customization to reclass GL using a custom record to drive the reclassing.
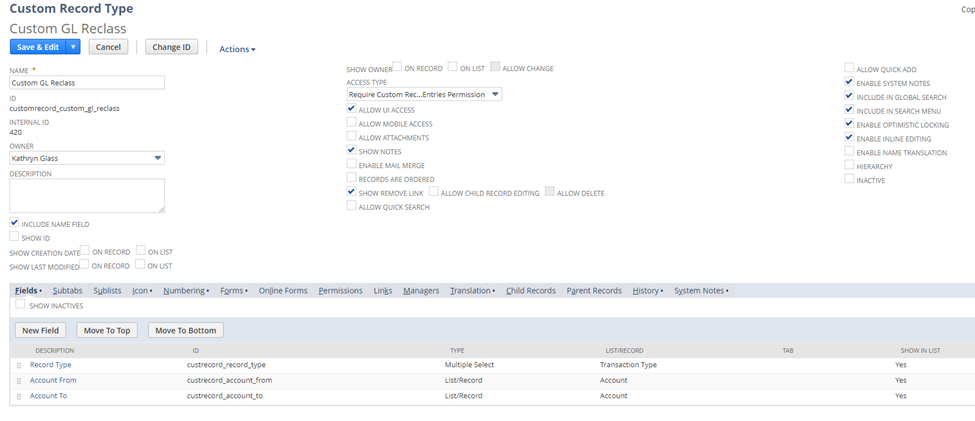
Step 1: Create a custom record “Custom GL Reclass”
The custom record will have three fields:
- “Record Type” – Transaction Type – Multi Select. This will list the record types where we want to reclass the GL.
- “From Account” – List/Record – Account. This is the account we want to move money from.
- “To Account” – List/Record – Account. This is the account we want to move money to.
Your custom record should look like this:
Step 2: Add custom records for accounts you want to reclass
For the example below, this record will reclass account 1100 Accounts Receivable: Accounts Receivable – Customers to account 1600 Accumulated Depreciation. It will only do this on the Invoice and Sales Order records.
See image for an example:

Step 3: Upload Custom GL Lines Plug-in Script to SuiteScripts folder
/* Use a custom record to drive creation of Custom GL lines */
function customizeGlImpact(transactionRecord, standardLines, customLines, book) {

    try {
        var tranType = transactionRecord.getRecordType();
        nlapiLogExecution('DEBUG', 'Transaction Type', tranType);

        var tranTypeId = transactionRecord.getFieldValue('ntype');
        nlapiLogExecution('DEBUG', 'Transaction Type Id', tranTypeId);

        var customGlDataArray = getCustomGLRecords(tranTypeId);
        nlapiLogExecution('DEBUG', 'Custom Records Available', customGlDataArray.length);

        var amountsForAccounts = getAmountsForAccounts(standardLines);

        for (var i = 0; i < customGlDataArray.length; i++) {
            var customGLData = customGlDataArray[i];

            if (customGLData.to && customGLData.from) {
                var amountForAccount = amountsForAccounts[customGLData.from];
                nlapiLogExecution("DEBUG", "Amount for account : ", amountForAccount);

                if (amountForAccount != 0) {
                    var newLine1 = customLines.addNewLine();
                    newLine1.setAccountId(parseInt(customGLData.from));
                    newLine1.setMemo("Custom Line 1");
                    if (amountForAccount < 0) {
                        newLine1.setDebitAmount(Math.abs(amountForAccount));
                    }
                    else {
                        newLine1.setCreditAmount(amountForAccount);
                    }

                    var newLine2 = customLines.addNewLine();
                    newLine2.setAccountId(parseInt(customGLData.to));
                    newLine2.setMemo("Custom Line 2");
                    if (amountForAccount < 0) {
                        newLine2.setCreditAmount(Math.abs(amountForAccount));
                    }
                    else {
                        newLine2.setDebitAmount(amountForAccount);
                    }
                }
            }
        }
    }
    catch (ex) {
        nlapiLogExecution('DEBUG', 'Error', JSON.stringify(ex));
    }
}

/* Get the custom record GL Reclass data for this record type */
function getCustomGLRecords(tranTypeId) {
    var customGlDataArray = [];
    var reclassSearch = nlapiSearchRecord("customrecord_custom_gl_reclass", null,
        [
            ["custrecord_record_type", "anyof", tranTypeId]
        ],
        [
            new nlobjSearchColumn("name"),
            new nlobjSearchColumn("custrecord_record_type"),
            new nlobjSearchColumn("custrecord_account_from"),
            new nlobjSearchColumn("custrecord_account_to")
        ]
    ) || [];

    for (var i = 0; i < reclassSearch.length; i++) {
        var data = {};
        data.name = reclassSearch[i].getValue('name');
        data.from = reclassSearch[i].getValue('custrecord_account_from');
        data.to = reclassSearch[i].getValue('custrecord_account_to');
        customGlDataArray.push(data);
    }
    return customGlDataArray;
}

/* Get the amounts for each account */
function getAmountsForAccounts(standardLines) {
    var standardLineCount = standardLines.getCount();
    var amountsForAccounts = {};
    for (var i = 0; i < standardLineCount; i++) {
        var selectedLine = standardLines.getLine(i);
        var account = selectedLine.getAccountId();
        if (!amountsForAccounts[account]) {
            amountsForAccounts[account] = 0;
        }
        var debitAmount = selectedLine.getDebitAmount();
        var creditAmount = selectedLine.getCreditAmount();
        amountsForAccounts[account] += parseFloat(debitAmount) + (parseFloat(creditAmount) * parseFloat(-1));
    }
    return amountsForAccounts;
}
Step 4: Create the Custom GL Lines Plug-in Implementation
- Go to Customization->Plug-ins->Plug-in Implementations->New
- Select the file that you just uploaded.
- It will then ask you to select the Plug-in type. Select “Custom GL Lines Plug-in”.
- Set the name for the Plug-in implementation and click Save.
- Click the “Configure” button.
- Select the transaction types you want the Custom GL Lines Plug-in to run on and click Save.
- You will then see a page “Manage Plug-In Implementations”. Click the checkbox next to the name of your Custom GL Lines Plug-in and click Save.
That’s it! Your custom GL Lines Plug-in is ready to be tested. After testing remember to go back and move the status from “Testing” to “Released”. This will enable it for other users.
Here is an example of reclassed lines:

There are a couple enhancements that could be done here:
- Modify the script to reclass based on the combination of account and other segments (department, location, and class).
- Add custom logic on the transaction itself so that the custom GL Lines Plug-in only runs in specific instances.
- As an example, you could create a multi-select transaction body field of type “Custom GL Reclass”. Then have another script set this field based on custom logic. You would then modify the Custom GL Lines Plug-in script to only execute for those specific “Custom GL Reclass” records that are set on the transaction.
- Another simpler option could be to just add a transaction body checkbox “Run Custom GL”. Another script would set this based on custom logic. You would modify the custom GL Lines Plug-in script to only execute when the checkbox is checked.
Conclusion
I hope you enjoyed reading about how to create a Custom GL Lines Plug-in. Do you need help building a Custom GL Lines Plug-in for NetSuite? Please contact us here to set up a consultation.
